

Who doesn’t love those shiny aluminum containers of fizzy goodness? We all enjoy a refreshing soda on a hot day, but did you know there are a whole lot of fun and creative things you can do with empty soda cans?
From craft projects to crafts to science experiments and more, you can create all kinds of cool things with soda cans.
Here we’ll explore some of the most awesome things to do with empty soda cans.
10 Creative & Cool Things To Do With Soda Cans
1. Construct a Soda Can Robot
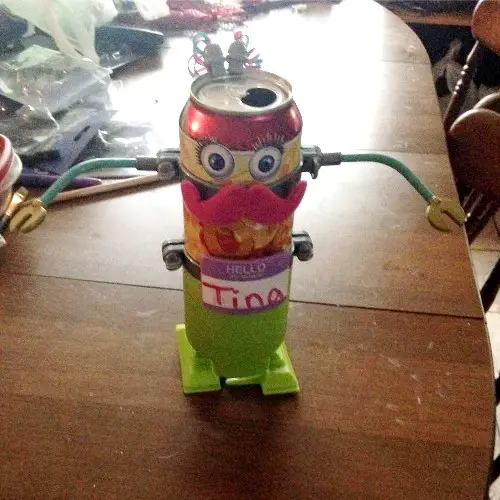
Use your creativity and imagination to create a robot out of soda cans. All you need is a few cans, some glue, strings, and a lot of creativity.
Cut the top off of an empty soda can and then make four small holes in the sides. Feed four pieces of string or twine through the holes and tie them off on the outside. Place a battery-operated motor inside the can and attach the strings to it.
Attach the strings to four small objects, such as bottle caps or small plastic figurines, to act as legs. Turn on the motor and watch your robot come to life.
2. Create a Soda Can Wind Chime
Step 1 – Take several soda cans of various sizes and shapes and place a hole in the center of the top and bottom of each can.
Step 2 – Cut out a piece of colorful ribbon or string and feed one end through the hole in the top of the can and the other end through the hole in the bottom of the can.
Step 3 – Tie the ends together to secure the can in place. Repeat this process with the other cans until you have as many as you like.
Step 4 – Hang the cans on a rod or line and secure them with string, and you have a unique wind chime.
3. Make a Soda Can Lantern
You can make a cool lantern out of a few soda cans, some wire, and a battery-powered light. Start by cutting two large circles on the sides of two cans just below the top.
Then cut a smaller circle in the center of each of the two large processes. Cut four small strips of metal in the shape of a cross out of the tops of two more cans.
With the two large circles, sandwich the two strips of metal between the two circles and attach them with a wire. Now, attach the battery-powered light to the inside of the lantern and turn it on. You now have a unique and cool soda can lantern.
4. Upcycle Into a Vase
They can be easily upcycled into a decorative and unique vase that can be used to hold flowers or other decorative items.
Start by cutting the top of the can off, then wrap the can in decorative wrapping paper or paint it with a design of your choice. Once the can is completely dry, fill it with water and add flowers or other items. You now have a decorative vase made from an upcycled soda can.
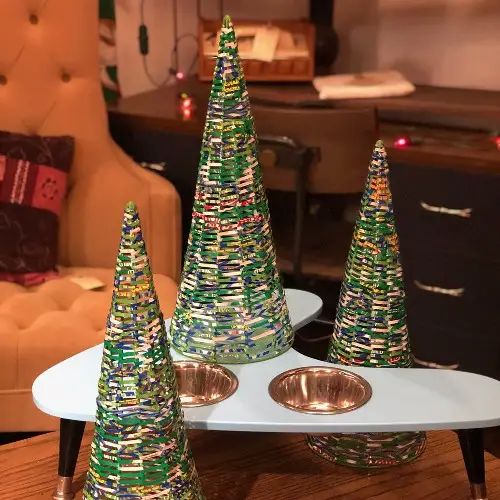
5. Soda Can Sculptures
You can recycle soda cans into creative sculptures. You can use a variety of tools to manipulate the cans into shapes such as animals, buildings, or abstract art.
Use scissors, tin snips, and other tools to cut and bend the cans into the desired shapes. You can paint the sculpture with metallic paint to further enhance the look.
6. Make a napkin holder
You can make a napkin holder using a soda can by following these steps:
Step 1 – Take an empty soda can and clean it out.
Step 2 – Cut off the top of the can using a can opener.
Step 3 – Cut out a piece of cardboard or craft paper slightly larger than the circumference of the can.
Step 4 – Wrap the cardboard or craft paper around the can and secure it with hot glue.
Step 5 – Cut out a small piece of cardboard or craft paper and glue it to the bottom of the can. This will serve as the base of the napkin holder.
Step 6 – Decorate the holder with ribbon, fabric, buttons, or any other decorations you would like. Place the napkins inside the holder.
7. Create a Christmas tree ornament
Materials:
- Empty aluminum soda can
- Scissors
- Ribbon
- Glue
- Paintbrushes
- Green paint
- Glitter
- Sequins
Instructions:
Step 1 – Rinse and dry the empty aluminum soda can.
Step 2 – Cut the can into a circular shape with scissors.
Step 3 – Paint the can green and let it dry.
Step 4 – Glue the ribbon to the back of the can to form a loop for hanging.
Step 5 – Add glitter and sequins for sparkle and shine.
Step 6 – Let the ornament dry and hang it on the tree.
8. Create a table centerpiece
To make a table centerpiece with soda cans, you will need the following materials:
- Several empty soda cans
- Scissors
- Glue or tape
- Decorative items (such as ribbon, artificial flowers, or any other small decorations)
Instructions:
Step 1 – Rinse and dry the soda cans. If desired, you can remove the labels by soaking the cans in warm water for a few minutes and then gently peel off the labels.
Step 2 – Cut the tops and bottoms off of the cans. You can use scissors or a can opener to do this.
Step 3 – Arrange the cans in a circular pattern on a flat surface, with the open ends facing up. You can overlap the cans slightly if desired.
Step 4 – Secure the cans in place using glue or tape.
Step 5 – Decorate the cans as desired. You can wrap the cans with ribbon, attach artificial flowers or other small decorations using glue or tape, or simply leave the cans as they are.
Step 6 – Place the completed centerpiece on your table. You can fill the cans with small candies, flowers, or other items to add color and interest.
9. Soda Can Coin Bank
A soda can coin bank is a great way to store and save your spare change. It’s a fun and easy way to teach children the value of saving money.
All you need is an empty soda can and some coins. Insert the coins into the top of the can and when it is full, you can open the bottom to retrieve your savings. This simple and unique craft project is a great way to get kids interested in saving money.
10. Soda Can Birdhouse
A soda can birdhouse is an easy and affordable way to add a unique touch to your garden. It can be made from one or two soda cans, depending on the size you need. All you need is a few basic supplies and a bit of creativity to create a beautiful and fun birdhouse.
To make your soda can birdhouse, start by cutting the top off of the cans and taking out any labels. Use a drill to make several 1/4-inch holes near the top of the can for ventilation. Then, cut a rectangular hole in the side of the can for the entrance.
Now, use hot glue to attach the two cans and attach a loop or wire to the top of the can for hanging. You can also decorate the outside of the can with paint, stickers, or other embellishments. Once it’s finished, hang it up and watch as birds make it their new home.
4 Cool Ways to use Old/Empty Soda Cans
1. Repurpose them as a planter
Turn old soda cans into mini-planters and use them to add a splash of greenery to your windowsill or balcony. Just make sure to add a few holes at the bottom of the can for proper drainage.
Turn the can into a planter by cutting off the top and bottom. Place a piece of screen or mesh in the bottom of the can to allow for drainage. Fill with soil and plants and hang up with a piece of string.
2. Make a Candle Holder
They can also be used to create a unique and stylish candle holder. To make one, start by cutting the can in half. Make two holes in the can using a hammer and nail.
Thread two pieces of twine or rope through the holes and tie them together on top. Then, fill the can with sand and place a tea light or small candle on top. Now you have a beautiful and creative candle holder that is guaranteed to start conversations.
3. Construct a Bird Feeder
Soda cans can also be used to make a bird feeder.
Step 1 – Gather your supplies. You will need two empty cans, a hammer, a nail, scissors, a ruler, a sharp knife, an awl, and bird seed.
Step 2 – Use the hammer and nail to make two holes in each can. One should be near the top and the other should be near the bottom.
Step 3 – Measure and mark a line 2 inches from the bottom of each can.
Step 4 – Use the sharp knife to cut along the line you marked. This will create a base for the bird feeder.
Step 5 – Measure and mark a line 2 inches from the top of each can.
Step 6 – Use the sharp knife to carefully cut along the line you marked. This will create a lid for the bird feeder.
Step 7 – Use the awl to make two small holes in the lid of the bird feeder. This will allow birds to access the seed.
Step 8 – Fill the feeder with birdseed.
Step 9 – Place the lid back on the feeder, and secure it with the hammer and nail.
Step 10 – Hang your bird feeder in a spot that is visible to birds. Now you can enjoy watching birds feed from your very own homemade bird feeder.
4. Make a stove
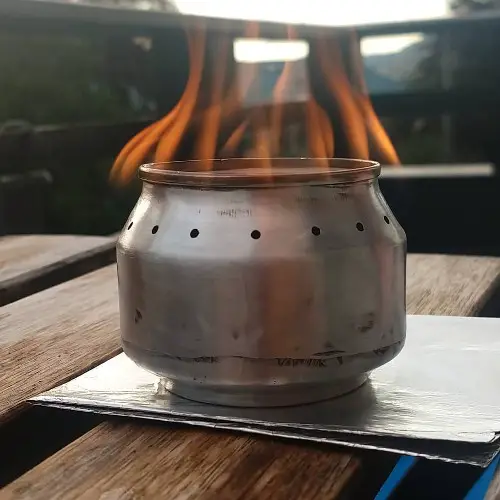
Soda cans can be used to create a small, lightweight, and portable stove for camping trips and other outdoor adventures.
Making a stove with empty soda cans is a simple and inexpensive way of making a portable camping stove. Here’s how you can do it:
1. Gather Materials – To make a soda can stove, you will need two empty soda cans, a pair of scissors, a utility knife, a drill, and a few pieces of scrap metal or wire. You will also need some kind of fuel, such as denatured alcohol, which can be purchased at most hardware stores.
2. Cut the Cans – Remove the top of one can and the bottom of the other using the utility knife. This will create two half-cans, one with the top cut off and one with the bottom cut off.
3. Drill Holes – Using the drill, create small holes around the lip of each can. Air will flow and heat will be regulated as a result.
4. Connect the Cans – Place the two cans together so that the lip of one can is inside the other can. Secure the two cans together by inserting wires or pieces of scrap metal through the holes that were drilled earlier.
5. Fill with Fuel – Pour the alcohol into the inner can. This will act as the fuel source that will generate the heat. Be sure to leave a gap between the fuel and the edges of the can so the heat will be evenly distributed.
6. Light the Stove – Light the stove by either using matches or a lighter. Once lit, the stove will begin to generate heat.
7. Enjoy Your Stove – Your stove is now ready to use. Be sure to keep an eye on the stove while it’s in use and always exercise caution when dealing with open flames. When you’re done using the stove, extinguish it properly.
